Tutorial
Written step by step as "which page → what to click → what to fill in → what you'll see". Follow along and you'll get from zero to deployment. The whole workflow runs offline on your computer, and your images and data never leave it (images are sent to the Xuntong AI platform only when you choose to use "Xuntong AI" assisted annotation).
01 Installation and first launch
1.1 Download and install
- Open the website https://wulabel.xiaowuiot.com and click Download in the top-right corner, or download from the GitHub Releases page.
-
Windows: download
Wulabel_<version>_x64-setup.exe, double-click it and follow the prompts. When it's done, open Wulabel from the Start menu or the desktop. -
Mac: download
Wulabel_<version>_universal.dmg, double-click to open it, and drag Wulabel into the Applications folder. -
Linux (from v0.4.0): download
Wulabel_<version>_amd64.deband runsudo apt install ./Wulabel_<version>_amd64.debin a terminal, then open Wulabel from the app menu. You can also download the.AppImage, runchmod +x Wulabel_<version>_amd64.AppImage, and double-click it to run without installing. On ARM computers (Phytium, Kunpeng), downloadWulabel_<version>_arm64.deborWulabel_<version>_aarch64.AppImage(from v0.4.2). Usage is the same.
-
System requirements: Windows 10 / 11 (64-bit); macOS 11 or later (Apple silicon and Intel); Linux x86_64 (Ubuntu 22.04 or later, Debian 12, UOS, Kylin on x86 computers, etc.); Linux ARM64 (from v0.4.2: Kylin, UOS and others on Phytium and Kunpeng computers; download the files with
arm64oraarch64in the name). - Not supported yet: Loongson, HarmonyOS. HarmonyOS devices can join team collaboration in a browser.
- If Windows says WebView2 is missing the first time you open the app, install it as prompted (most Windows 10 / 11 systems already have it).
-
On Mac, the first launch says the developer cannot be verified (the app isn't signed with an Apple developer certificate). In Applications, right-click Wulabel → Open → click Open again. On macOS 15 and later, double-click the app once, then go to System Settings → Privacy & Security and click Open Anyway at the bottom. If it says the app is damaged, run
xattr -cr /Applications/Wulabel.appin Terminal and open it again. You only need to do this the first time.
1.2 The main window
The first page you see is Projects. Once you open a project, the navigation bar on the left shows, from top to bottom:
| Page | What it's for |
|---|---|
| Projects | Create, open and switch projects |
| Data | Import images / videos / datasets, manage images, export datasets |
| Annotate | Draw boxes and polygons, pick classes, place keypoints, AI assist and pre-labeling |
| Health check | Find missed labels, wrong labels, duplicate images and other problems |
| Train | Choose a model, set parameters, start training, view training runs |
| Evaluate | Metrics, confusion matrix, errors, recommended threshold, false-positive tests, reports |
| Deploy | Live test, export models, build inference service packages, import field data |
| Collaborate | Live team collaboration: start sharing (LAN / online), members, task assignment, progress stats |
| Settings | Install the training environment, download sources, Xuntong AI |
The Feedback button and Close project are in the top-right corner.
02 Settings: training environment, download sources, Xuntong AI
If you only annotate and import/export without training, you can skip this chapter for now.
2.1 One-click training environment install
- Click Settings on the left.
-
Look at the "Training environment" section:
- The GPU row shows the detected GPU, VRAM, driver and supported CUDA version. Without an NVIDIA GPU it says "No NVIDIA GPU detected; training can only use the CPU (much slower)".
-
The PyTorch version drop-down picks the recommended version automatically (marked "Recommended"). You usually don't need to change it:
- CUDA 12.8: newer GPUs such as the RTX 50 series;
- CUDA 13.0: requires a recent driver;
- CUDA 11.8: older GPUs and drivers;
- CPU version: no NVIDIA GPU.
- (Optional) Install location: by default it goes into the local app data folder on drive C. If drive C is low on space, click to choose a drive with more space, then click Save.
- Click Install. The GPU version is about 3 GB. uv, Python 3.11 and PyTorch are downloaded automatically, and the time remaining is shown under the progress bar. You only need to install it once.
- When it's done, the status changes to Ready and shows "GPU available (cuda)" below.
The training environment is self-contained and doesn't affect any other Python on your system.
2.2 Download sources
- In the "Download source" section, click Test speed and recommend. The app downloads a few MB from the official sources and the China mirrors, then selects the faster one automatically.
- When "China mirrors" is selected, helper models such as SAM and text prompt are also downloaded from a China mirror (hf-mirror.com).
2.3 Xuntong AI (optional)
You only need this if you want to auto-label with models from the Xuntong AI platform, upload models, fetch alert images, or collaborate online through the "Xuntong official relay":
- In the "Xuntong AI" section, click Sign in to Xuntong AI.
- Your browser opens the Xuntong AI web page. Sign in first if you aren't already (the same way you normally sign in to Xuntong), check that the confirmation code on the page matches the one shown in Wulabel, and click Allow.
- Back in Wulabel, after a few seconds it shows Signed in as with your account name, plan and remaining quota, plus the available recognition methods (recognize by project classes, dedicated models enabled on the platform, general LLM recognition). No need to copy and paste a key.
- If the browser didn't open, click Reopen, or copy the address from the dialog and open it yourself.
- Sign out: the key on this computer is deleted, and the key created automatically at sign-in is revoked on the platform.
If you already have an API key, or your Xuntong platform is self-hosted, click Advanced: enter an API key manually or a self-hosted platform address, fill it in, and click Save and test connection. The connection status stays visible in this section.
2.4 Use an existing Python environment (advanced)
If you already have a Python environment with PyTorch installed, you can skip the download:
- Expand "Use an existing Python environment (advanced)".
-
Click Choose python.exe and select the environment's
python.exe(e.g.D:\envs\torch\Scripts\python.exe). - Click Save. The environment needs torch, torchvision, numpy and pillow; exporting ONNX also needs onnx.
- To switch back to the app's own environment, clear the path and save.
2.5 Check for updates
The app checks once for a new version at startup and shows a notice in the bottom-right corner if there is one. Click Update now, and the app downloads the new version in the background, verifies it, installs it and reopens itself, with no buttons to click along the way (Windows only shows an install progress bar; Linux installs from .deb can also update automatically from v0.4.2, and you may be asked for your system password once during install). Your projects and data are kept (from v0.4.1). You can also click "Download" to open the download page. To stop seeing the notice for a version, click "Don't remind me about this version". You can also click Check for updates manually under "About & updates" at the bottom of the Settings page.
The update check only sends the app version, OS type and a random anonymous ID, used to estimate roughly how many people use the app. It contains no images, projects or personal information. If you don't want it to go online, turn off Check for updates at startup under "About & updates".
2.6 Language, appearance and the Xuntong AI switch
At the top of the Settings page you can change:
- 语言 / Language (from v0.5.0): the interface is available in 简体中文, 繁體中文, English, 日本語, 한국어, Español, Português, Русский, Deutsch, Français, Tiếng Việt, Bahasa Indonesia. By default it uses Follow system (Chinese on a Chinese system, English for languages that aren't included); the interface reloads after you change it. Training logs, error messages, delivery reports and the inference service package's instructions use this language too.
- Appearance (from v0.5.1): Follow system, Light or Dark. By default it follows your system's light or dark mode. Image areas such as the annotation canvas and image preview always stay dark so images are easy to see.
- Xuntong AI switch (from v0.5.2): the switch in the top-right corner of the "Xuntong AI" card. It's on by default for Simplified Chinese and off for other languages. When it's off, Xuntong AI and the recognition rules on the Annotate page, fetching alert images on the Data page, uploading to Xuntong on the Deploy page and the Xuntong official relay on the Collaborate page are hidden; turn it on if you need them.
03 Create and open projects
A project is just a folder: images (copied in), annotations, models and training runs are all inside it. Copy the whole folder to another computer and it opens directly.
The first time you use the app, the top of the "Projects" page shows a getting started guide. It walks you through six steps: install the training environment, create a project, import images, annotate a small batch, train, then pre-label and deploy. Finished steps are checked off automatically. Click × in the top-right corner to close it; click "Show getting started guide" to bring it back later.
The cards under "Recent projects" show the project cover, the number of images, how many are labeled (progress bar) and how many times it has been trained, so you can see at a glance how far each project has come.
3.1 Create a project
- On the Projects page, click New project.
- Project name: e.g. "Construction site helmet detection".
- Location: the default is "Documents/Wulabel"; you can also click Browse to choose another folder. The project will be created inside it.
-
Task type (can't be changed after creation):
Task Annotation Good for Object detection Rectangle boxes Locating hard hats, vehicles, smoke and fire Instance segmentation Polygon outlines Precise shapes: puddles, garbage piles, defect areas Image classification One class per image "Normal / abnormal" scenes, scene categories Keypoints Object box + points placed by template Human pose (falls, climbing), key parts of objects - Classes (optional): write down the classes you want to label in advance, separated with commas or new lines, e.g. "Helmet, Person, Reflective vest". If you leave it empty, you can add them on the Annotate page at any time.
- Click Create. You'll see "Project "…" created" and it opens automatically.
3.2 Open a project
- Click a project in the Recent projects list to open it. The list shows when each project was last opened.
- If it isn't in the list, click Open project… and choose the project folder.
- If a project folder has been moved, the list shows "Folder not found": click Locate… and choose its new location to keep using it. If the folder has been deleted, click "Remove from list" (files are not deleted).
04 Import data
Click Data on the left.
4.1 Import images or folders
-
First choose the import mode at the top of the page:
- Copy into project: images are copied into the project folder, so the whole project can be moved (recommended);
- Reference original paths: only the images' original locations are recorded. No extra space is used, but the originals must not be moved.
-
Import:
- Click Import folder and choose a folder (images in subfolders are found automatically);
- Or click More import options → Import image files and select some images;
- Or just drag images and folders into the window and let go when you see "Release to import images or videos". If you drag in a video file, the "Extract frames from video" dialog opens directly (see 4.2).
- Progress is shown during import: "Processed N / M images (computing fingerprints, generating thumbnails)". If you picked the wrong thing, click Stop; images already processed are still added. When it's done, it tells you how many were added and how many duplicates were skipped; click Start annotating in the message to go straight to the Annotate page.
Imports are automatically deduplicated by content (the same image is never imported twice), and photos are rotated upright based on their EXIF data.
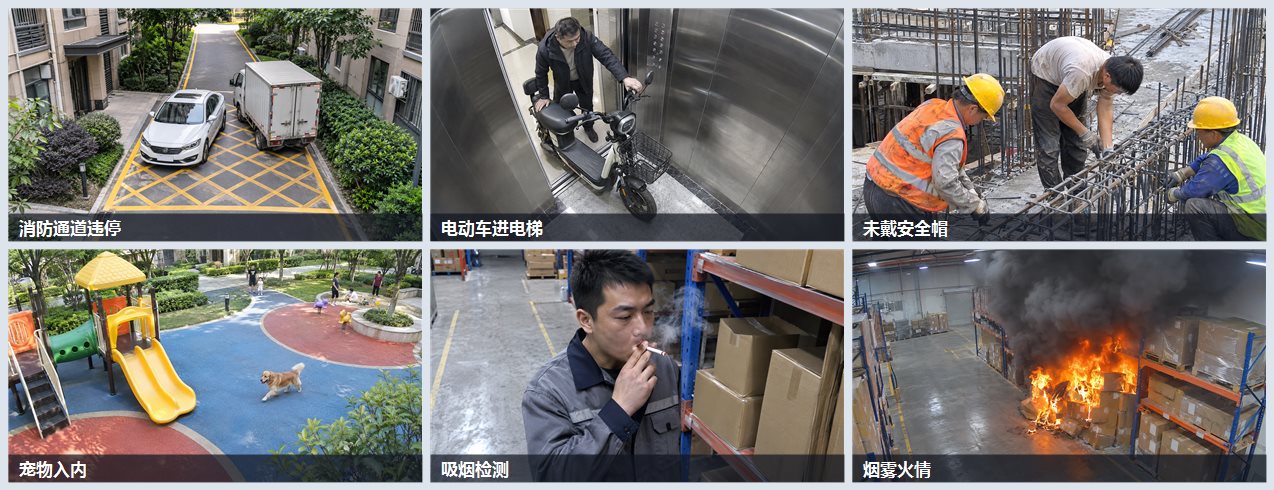
4.2 Import videos (extract frames)
- Click More import options → Import videos (extract frames) and select one or more video files.
-
In the "Extract frames from video" dialog, set:
- Every N seconds, extract 1 frame: if things change slowly, use a longer interval to avoid piles of nearly identical images;
- Max N frames per video (0 = unlimited).
- Click Start extracting. The first time, ffmpeg (about 90 MB) is downloaded automatically. You won't need to download it again. If you set the wrong parameters, click Stop; frames already extracted are still imported.
- Extracted frames are copied into the project and deduplicated by content automatically. When it's done, you'll see "Extracted M frames from N videos: added K images".
4.3 Extract frames from a video stream (RTSP / live / playback)
- Click More import options → Extract frames from a video stream (RTSP / live / playback).
-
Enter the address: an RTSP camera (
rtsp://…), or an http(s) live, playback or on-demand address (mp4, m3u8, flv).-
Hikvision:
rtsp://username:password@IP:554/Streaming/Channels/101(main stream) or102(sub stream) -
Dahua:
rtsp://username:password@IP:554/cam/realmonitor?channel=1&subtype=0
-
Hikvision:
- Click Test connection. It shows the resolution and whether it's a "Live stream (endless, set a limit)" or a "Playback stream · Duration …".
-
Settings:
- Every N seconds, extract 1 frame;
- Extract up to N frames, Capture for up to N minutes (0 = unlimited, live only). A live stream never ends, so set at least one of these;
- Check Skip nearly identical frames to save fewer duplicates when the scene is still.
- Click Start capture. Images are added as they are captured, and you can watch them appear one by one on the Data page.
- During capture, click Minimize to do other things. The bottom-right corner shows "Capturing · N frames extracted"; click Expand to come back. Click Stop capture to finish at any time. Images already captured are kept.
-
Captured images are saved in the project's
images/stream_<address>_<time>/folder. When it's done, click Open folder to view them.
The account and password are only used during capture. The app never writes an address containing a password into the project's folder names.
4.4 Import an annotated dataset
If you already have data labeled elsewhere, you can import it together with its annotations:
-
Click More import options and choose by project type:
- Detection / segmentation projects: Import annotated dataset (YOLO / COCO / VOC). Supports YOLO (including seg), COCO (including segmentation) and VOC;
- Keypoint projects: Import annotated dataset (YOLO-pose / COCO keypoints);
- Classification projects: Import classification dataset (one folder per class). Each subfolder of the selected folder is one class (there can also be a train / val level in between).
- Select the dataset's root folder. The format is detected automatically.
- When it's done, you'll see "Imported YOLO dataset" or similar, plus which classes were added.
4.5 Bulk actions, undo, delete, clear
The stat cards at the top of the Data page (Unlabeled, Labeled, Skipped) are clickable: click one to show only that kind of image, and click it again to go back to all images. The filter buttons below work the same way.
These are all in the Manage menu:
-
Select multiple: enters selection mode. Click images to select them; hold Shift and click another image to select everything in between. "Select all on page" selects this page, and "Select all N images" selects every image under the current filter. Then you can:
- Mark as skipped: these images are left out of training;
- Restore to unlabeled: images that already have annotations go back to Labeled;
- Go to annotation: sends only the selected images to the Annotate page to label one by one;
- Split: move them to the training, validation or test set (only works on labeled images; see 10.1);
-
Delete.
Changing the filter or the page clears the selection, so you never delete images you can't see. Finally, click Done to exit.
- Undo last import (N images): if you just imported the wrong thing, delete the last import's images in one click (one video stream capture counts as one import).
- Clear all images: deletes every image in the project.
Deleting an image also deletes its annotations, and this can't be undone. Image copies made inside the project are deleted; the original images on your computer are not affected.
4.6 Image quality check
Blurry, too dark or overexposed images are hard to annotate and can mislead the model in training. You can filter them out first:
- Click Manage → Image quality check (blurry, too dark, overexposed).
- Unlabeled images only is checked by default. Uncheck it to check everything.
- Click Start check.
- Results are grouped by problem: Blurry, Too dark, Overexposed, Low contrast. Click the tags at the top to filter. Each image shows its sharpness, brightness, overexposed ratio and contrast values.
-
What to do with them:
- Review one by one: go to the Annotate page and look at each image yourself;
- Mark as skipped: mark them as "Skipped" so they're left out of training (the images stay and you can undo this later);
- Delete: delete them outright.
4.7 Fetch alert images from Xuntong AI
Once a model is deployed on the Xuntong AI platform, the on-site alert snapshots (especially false positives and missed detections) are exactly the data most worth adding:
- First set up Xuntong AI in Settings (see 2.3).
- On the Data page, click More import options → Fetch alert images from Xuntong AI.
- Choose the time range (last 1 / 3 / 7 days; the platform keeps alert images for 7 days, so fetch regularly), the model (all or a specific one), and Up to N images. Only Xuntong accounts with a push channel configured generate alert records.
- Use the platform's detected boxes as pre-labels is checked by default: boxes are matched to project classes by class name, and missing classes are created.
-
Click Start fetching. Images are saved in the project's
images/xuntong_<time>/folder, and the detected boxes appear as dashed lines (source "Xuntong"). - Review them on the Annotate page: delete false-positive boxes (for an image with no objects, just press Enter (Done) to keep it as a negative sample), add what was missed, then retrain.
05 Annotate
Click Annotate on the left.
5.1 The Annotate page
- Top: left/right arrows to browse images, the current image name and position (image N of M; click the number to type an image number and jump straight to it), resolution, and a status tag (Unlabeled / Labeled / Skipped; images with no objects show "No objects"); the filter buttons All / Unlabeled / Labeled / Skipped (with team collaboration, also "Reviewed" and "Rejected"); on the far right, the zoom level and save status (Saved / Unsaved / Saving… / Save failed).
- Left toolbar: Select, Draw box (or Draw polygon), SAM smart select, Undo, Redo, Copy previous image, Keyframe interpolation, Track forward, Fit to window. Hover over a tool to see what it does and its shortcut.
- Center: the image canvas. Scroll to zoom; hold Space or right-drag to pan.
- Right: the "AI assist", "Class", "Objects in this image" ("Image class" in classification projects) and "Done" panels (with team collaboration, the last one is called "Review").
- Below the canvas: hints for the shortcuts available in the current project; press ? to open the panel with all shortcuts.
- Very bottom: a thumbnail strip of the nearby images. Click one to jump straight to it. The small dot in the top-right corner of a thumbnail shows its status: blue is Labeled, gray is Skipped, no dot is Unlabeled.
Changes are saved automatically. There's no need to save manually.
5.2 Add and manage classes
- In the "Class" panel on the right, type in the "New class name, press Enter to add" box, e.g. "Helmet", and press Enter.
- The first 9 classes can be switched quickly with the number keys 1–9. The current class is highlighted.
-
Click the edit button next to a class to:
- Change its name and color;
-
Fill in an English prompt (used by "Text prompt" auto-annotation; separate multiple terms with commas, e.g.
helmet, hard hat); - Fill in Recognition notes (used by Xuntong AI "Recognize by project classes": what exactly this class means, and what does / doesn't count, e.g. "A person without a helmet on; wearing a helmet without fastening the strap also counts");
- Delete the class. If the class already has annotations, you can choose another class under "Merge into…", and its annotations are changed to that class instead of being lost (handy when you used the wrong class or want to combine two classes into one). If you don't choose one, the class is simply deleted along with its annotations.
5.3 Object detection: draw boxes
- Press 1–9 to pick a class.
- Press R (or click the Draw box tool on the left), then hold the mouse button and drag a box over the object.
- Adjust: press V to switch to the Select tool, click a box, then drag it to move it or drag its edges and corners to resize it.
- Delete: select a box and press Del or Backspace; press Esc to deselect.
- Change the class: select a box and press a number key, or change it under "Objects in this image" on the right.
- Press H to hide / show the class names on boxes, which helps when boxes are crowded.
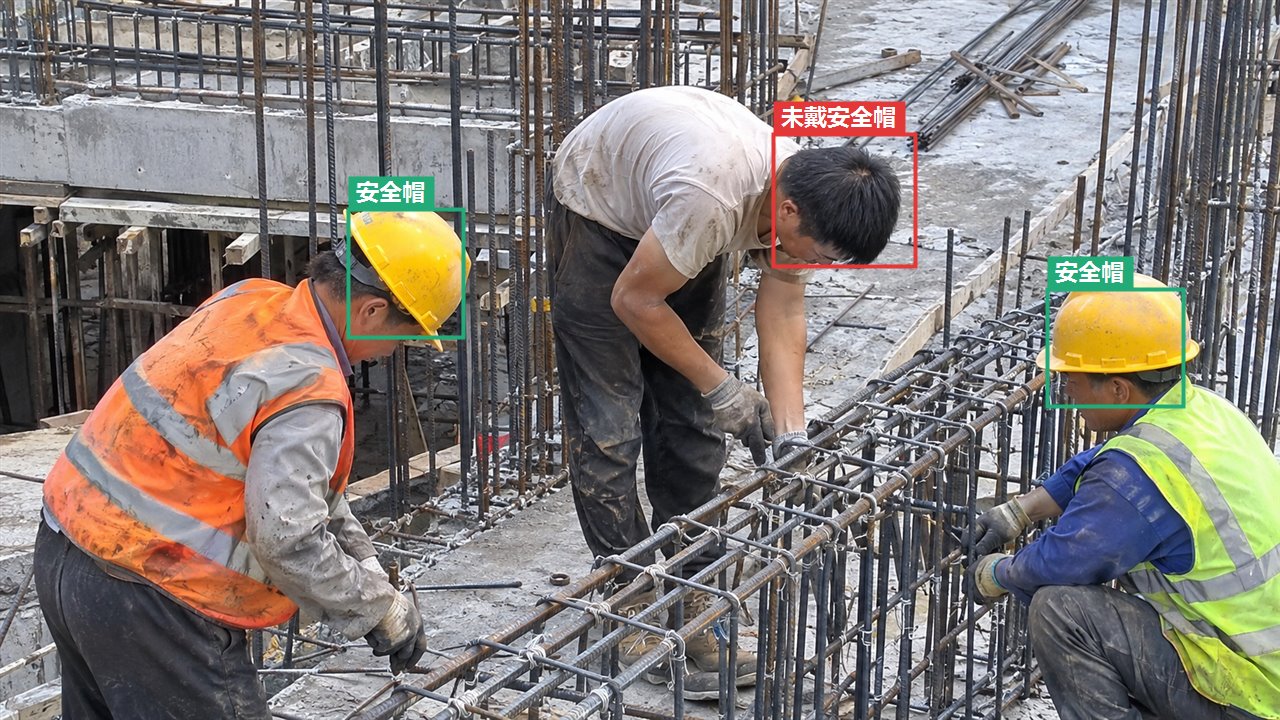
5.4 Instance segmentation: draw polygons
- Pick a class and press R.
- Click point by point along the object's edge.
- Double-click or press Enter to close the polygon; if you click in the wrong place, press Backspace to remove the last point.
- Select a polygon to drag its vertices for fine-tuning.
- A faster way is to press S for SAM smart select: one click gives you an outline automatically (see Chapter 6).
5.5 Image classification: one key per image
- Look at the image and press a number key 1–9 to pick its class. The current class is shown in the top-left corner of the image.
- Turn on the Auto-advance switch on the right, and each number key press jumps to the next image automatically: one key per image.
- Press Del to clear this image's class; press Ctrl+D to reuse the previous image's class.
5.6 Keypoints
-
First look at the Keypoint template on the right. The default is "COCO person 17 points" (nose, left eye, right eye … left ankle, right ankle). To change it, click Edit:
- Template name;
- Point names (one per line; the order of the points is the order you click them when annotating);
-
Connections (one pair of numbers per line, e.g.
1-2, used to draw the skeleton); - You can also click Use COCO person 17 points to restore the default.
- Once keypoint annotations exist, you can only change names and connections, not add or remove points.
- Pick a class and press R to draw the object box.
-
After drawing the box, click each keypoint in turn as prompted (the bottom of the canvas tells you which point is next, e.g. "Click Left shoulder (6/17)"):
- Normal click: a visible point;
- Shift + click: an occluded point;
- N: skip a point you can't see;
- Backspace: go back to the previous point;
- Esc: finish this object.
- Fine-tune: select an object and drag its keypoints directly. The right panel lists each point's status. Click a name to re-place that point on its own; click the status to toggle between "Visible / Occluded".
- Select an object and click Re-place keypoints to redo it from the first point.
5.7 Copy previous image, undo and redo
- Ctrl+D (or the copy button on the left): brings over the previous image's whole set of annotations, which saves a lot of time on similar scenes and consecutive frames. In classification projects it reuses the previous image's class.
- Ctrl+Z to undo, Ctrl+Y to redo.
5.8 Done and skip
When you annotate on your own, there's no review step: an image with objects labeled automatically counts as "Labeled" and is used in training directly. In the "Done" panel on the right:
-
Done & next (shortcut Enter): jumps to the next unlabeled image.
- If this image really has no objects, pressing Enter records it as "No objects", and it's used in training as a negative sample (teaching the model not to raise false positives on scenes like this). If you pressed it by mistake, click Undo status in the message.
- For images from batch pre-labeling (dashed boxes), once you've checked and fixed them, press Enter and they count as Labeled.
- Skip (shortcut X): marks it as "Skipped", so this image is left out of training. Good for blurry or irrelevant images.
- Undo status: changes "No objects" or "Skipped" back to the previous status.
- Shift+D: jumps straight to the next unlabeled image.
When you finish the last image, you'll see "This batch is done" with the number of labeled images and the number still to label. You can click Go to training or Keep labeling unlabeled.
Choose "Skipped" in the filter at the top to find skipped images and check them again.
The review workflow only exists with team collaboration (when you've added members or started live collaboration). Then this panel becomes "Review", and the buttons are Approve & next and Reject; see Chapter 9.
5.9 Video frames: keyframe interpolation and track forward
This works in detection and keypoint projects. Frames extracted from a video (in the same folder, ordered by file name) don't have to be labeled one by one.
Keyframe interpolation (for segments where objects move at a steady pace):
- Go to the first frame of the segment and label all the objects (this is a "keyframe").
- Go to the last frame of the segment and label the same objects.
- On this last frame, click the Keyframe interpolation button on the left.
- The app matches the objects at both ends by class and position and fills in the frames in between automatically. It shows "Interpolated M objects across N in-between frames"; objects that don't match at both ends are reported separately.
Track forward (when objects move irregularly):
- Label the objects on the current frame.
- Click the Track forward button on the left, enter the number of Frames in the small pop-up (default 30, max 500), and click Track.
- The app follows the boxes from this frame onward, frame by frame. It stops when an object is blocked or lost, and also stops when it reaches a later frame you labeled manually, so it never overwrites manual annotations.
- When it's done, it jumps to the last tracked frame. If a box has drifted, drag it back into place (a box you've dragged becomes a manual annotation, and this frame becomes a new keyframe), then click Track forward again to keep going.
Boxes created by interpolation and tracking show their source as "Interpolated" or "Track" under "Objects in this image" on the right. Interpolating or tracking again replaces them; manually drawn boxes are never changed.
Time-saving tip: label a small batch by hand first (a few dozen to a couple hundred images), train a first model, then use it to pre-label the rest (Chapter 12). You only need to fix the mistakes.
06 AI-assisted annotation
Even before you have your own model, AI can help you annotate.
6.1 SAM smart select
- Pick a class and press S (or click the SAM button on the left).
- The first time, it installs components and downloads the model, which may take a few minutes. The canvas shows "Preparing SAM…". With an NVIDIA GPU it uses SAM ViT-B; otherwise it uses the compact SlimSAM.
-
Click once on an object to select its outline automatically (preview).
- Selected too much: Shift + click the extra area to exclude it;
- Selected too little: click the part that was missed;
- Clicked in the wrong place: press Backspace to remove the last point;
- You can also drag a box around the object.
- When you're happy with it, press Enter to accept it as the current class; press Esc to discard.
- Result: segmentation projects get a polygon, detection projects get a tight box, and keypoint projects get a new object (then click "Re-place keypoints" to place its points).
6.2 Text prompt
Finds objects in the image by class name automatically:
- In the "AI assist" panel on the right, choose Text prompt.
- The model only understands English. Over a hundred common Chinese class names (such as 安全帽 "helmet", 人员 "person", 电动车 "e-bike", 渣土车 "dump truck", 锥桶 "traffic cone") are mapped to English automatically, and the English name is shown after the class name, e.g. "安全帽 · helmet". It also works if a Chinese class name contains one of these words, e.g. 红色安全帽 ("red helmet"). If a name isn't mapped or you want to change it, fill in the English prompt when editing the class.
- Adjust Confidence: raise it if it finds too much, lower it if it finds nothing.
- Click Annotate this image (P) to label the current image, or click Batch pre-label to label a batch at once.
- The first time, the model has to be downloaded, which takes a few minutes. Segmentation projects also use SAM to produce outlines.
6.3 Xuntong AI
(For the full Xuntong AI guide, see Chapter 16.)
- First set up Xuntong AI in Settings (see 2.3).
-
In "AI assist", choose Xuntong AI, then choose under "Select a recognition model":
- Recognize by project classes (recommended): finds only the project's classes, with class names matched exactly, following each class's recognition notes and the overall rules, so it won't pick up things you don't need;
- Dedicated models enabled on the platform;
- General LLM recognition: finds hazards by safety hazard category (fire safety, electrical, sanitation, etc.).
- Click Annotate this image (P) or Batch pre-label. Batch pre-labeling with a dedicated model (e.g. waste sorting) is fast: 8 images per batch, two batches sent at a time. The LLM and recognize-by-project-classes methods go one image at a time, so they're slower.
- Xuntong AI counts 1 call per image and uses your account's plan quota. You'll be told before a batch starts.
6.4 Recognition rules: tell AI how to recognize
A class name alone doesn't always tell the AI exactly what you want. You can spell out the rules, or just chat with the AI:
- Click Recognition rules next to the "AI assist" title to open the recognition rules panel on the right.
-
Chat with AI: describe in plain words how to recognize things, e.g. "a helmet with the strap undone still counts as no helmet", "reflective vests don't count", "only look at the walkway in the lower half of the frame". You can also ask "why wasn't the person on the left of this image recognized?"
- Attach the current image is checked by default, and the AI tries recognizing this image with the new rules.
- After the AI replies, if it suggests updating the rules, you'll see "AI suggests updating rules" with the details. They're only saved when you click Apply these rules.
- If the trial recognition found something, click Add the N trial boxes to this image to use them directly as pre-labels.
-
Ctrl+Entersends. Each message uses Xuntong AI quota.
- Current rules: you can edit the Overall rules (apply to all classes) and the Recognition notes per class directly, then click Save rules.
- From then on, pre-labeling with Xuntong AI "Recognize by project classes" follows these rules.
- (Optional) At the bottom of "Current rules", click Sync to Xuntong platform to store the classes and rules on the Xuntong platform. They're disabled by default, so the platform's current recognition is unaffected. Once bound, every time you save or apply rules the content syncs automatically (it won't change the on/off state or the scenes you set in the Xuntong console).
- To make the Xuntong platform's own recognition (snapshot assistant, alert push) report only the classes you want, turn on Use these rules for platform recognition. Note: once on, recognition for your whole Xuntong account follows this project's classes; the scenes it applies to can be adjusted under "Recognition rules" in the Xuntong console. To stop syncing, click Unbind (the rules on the platform are not deleted). Each Xuntong account can have up to 20 rule sets.
Limits: recognize by project classes supports up to 30 classes, with class names of at most 30 characters; overall rules can be up to 1000 characters, and each class's recognition notes up to 500 characters.
During collaboration, members can also open recognition rules and chat with the AI (using the host's quota, if the host has enabled AI assist); whether they can edit the rules follows the "Members can add and edit classes" switch.
6.5 Check the AI results
Boxes and polygons added by AI are shown as dashed lines. Go through them: delete the wrong ones, drag the off ones into place, add what was missed, then press Enter (Done & next).
07 Health check
Click Health check on the left to find problems in your data in one go.
-
Choose how to check:
- If you have a trained model: choose "Check with model: <model name> · mAP50 …" to run the rule checks and the model checks together;
- If you have no model: choose "Rule checks only (no model)".
- Click Start health check.
-
Results are grouped by problem:
Problem Meaning Needs a model Possibly unlabeled The model is confident there's an object here, but it isn't annotated Yes Possibly wrong class The box position matches, but the class differs from the model's prediction Yes Inaccurate box Same class, but the box overlaps poorly with the model's prediction Yes Possibly extra box There's a box, but the model sees nothing at this location Yes Tiny box Short side under 8 pixels; the model can barely learn from it No Duplicate box Two boxes of the same class in one image almost completely overlap No Duplicate images Nearly identical images, which inflate evaluation results No No class Boxes without a class aren't used in training No -
For each issue you can:
- Fix: jump to the Annotate page with this box highlighted;
- Add as annotation: for a possibly unlabeled object, add a box based on the model's prediction directly;
-
Not an issue: ignore it, and future health checks won't flag it again.
When one kind of issue has many entries, use Add all as annotations (possibly unlabeled) or Ignore all to handle them in one go. Ignored issues can be brought back by clicking "Ignored N items · Restore".
- Images you fixed on the Annotate page are marked "Edited" and collapsed by default when you come back to the health check page, so you don't need to run the health check again.
- Duplicate images are shown in groups, and each image shows its status and number of annotations. The one with the green border is kept; by default it's the one with the most complete annotations (Reviewed > Labeled > more annotations). Click another image to switch, or double-click to view it on the Annotate page. Click Keep one per group to delete the rest; images with annotations won't be deleted by mistake.
- Further down the page are the Class distribution (boxes · images) and the Box size distribution. If a class has too few annotations or boxes are too small, you'll get suggestions. Classification projects are only checked for possibly wrong class and duplicate images.
08 Dataset versions
Save your data at a point in time as a snapshot, so you can compare and roll back.
- On the Data page, click Manage → Dataset versions (snapshot, compare, restore).
-
Fill in a Version name (e.g. v1, added night images) and a Note (optional), then click Save current data as new version.
- A version stores the currently labeled and reviewed images and annotations, plus the train / val / test split.
-
Each row in the version list lets you:
- Compare with current data: see added images, removed images, images with changed annotations, and how the annotation count of each class has changed;
- Export this version;
- Restore to this version: before restoring, the current data is saved automatically as an "Auto backup before restore" version, so you can always go back;
- Rename, edit note, Delete this version (only deletes the snapshot; current data and trained models are not affected).
- Under "Training data" on the Train page, you can choose a version to train on (see 10.1).
09 Team collaboration
When there are too many images for one person, there are two ways to share the work:
- Live collaboration: several people annotate the same project at the same time. Your computer is the host; members open an address in a browser, sign in and start annotating, and changes sync in real time. Works on a LAN or over the internet.
- Offline packages: when there's no network, or data can't leave the company, split the images into annotation packages, copy them to other people, and merge them back when they're done (see 9.10).
9.1 Start live collaboration
- Click Collaborate on the left.
-
First add members under "Members": enter a Name (used to sign in) and choose a Role. A random password is generated by default (you can change it). Click Add. Copy the account and password shown and send them to the member (they're only shown this once; if forgotten, use Reset password).
- Annotator: can only see and edit images assigned to them;
- Reviewer: can see all images and approves or rejects them;
- You are the Admin.
-
Under "Sharing", choose how to share:
- LAN: members are on the same company network or the same Wi-Fi as you. Fastest, and data never leaves your company.
-
Online · Self-hosted relay: members are on the internet (outsourcing, working from home). Requires your own cloud server running the Wulabel relay service (see the
relay/folder in the repository for deployment instructions). Enter the Relay URL and Secret. Data only passes through your own server. - Online · Xuntong official relay: for members on the internet when you don't have your own server. Connects to Xuntong's relay server with your Xuntong API key. Images and annotations are forwarded through Xuntong's servers (forwarded only, not stored). For sensitive data, use one of the first two options.
- Enter Your name (the host name members will see). The Port usually doesn't need changing (default 8765).
-
Options:
- Members can use AI assistance: SAM smart select, model pre-labeling and text prompts all run on your computer; chatting with AI about recognition rules uses your Xuntong quota.
- Members can add and edit classes and recognition notes: deleting a class removes all its annotations, so only you can do that.
- Overlay a watermark with the member's name on their screen: deters leaked screenshots; good for outsourcing.
-
Click Start collaboration. The page shows the LAN address (e.g.
http://192.168.1.20:8765/); in online mode it also shows the Internet address (e.g.https://relay.example.com/s/xxxxxxxxxxxx/). Send the address and each member's account and password to them.- The first time you start, Windows may show a firewall prompt. Click Allow.
- While collaboration is running, you can change the three options at any time, and they take effect immediately.
- Click Stop collaboration to disconnect members immediately. Saved annotations are not affected. Switching projects or closing Wulabel also stops it.
9.2 Assign tasks
- Under "Assign tasks", select annotators (you can click Select all annotators).
-
Choose the scope:
- Unlabeled images not yet assigned (most common);
- All unlabeled images (reassign assigned ones too);
- Unreviewed images (unlabeled + labeled).
- N per person: leave it empty to split all images in the scope evenly. Images are assigned in order, so consecutive video frames go to the same person.
- Click Assign. Members' task lists refresh automatically with the new tasks.
- The member list shows how many images each person was assigned, has submitted, and has had rejected. Click Take back tasks to take back the images they haven't submitted yet, so you can assign them to someone else.
9.3 How members annotate (in a browser)
- Open the address from the host in Chrome or Edge, and sign in with your Name and Password. On your own computer, you can check Keep me signed in. No software install needed.
- You land on the Annotate page, which only shows the images assigned to you. It works the same as in Wulabel: drawing boxes, shortcuts, AI assist (if the host has enabled it). The top-right corner shows how many images you submitted today.
-
When you finish an image, click Submit & next (
Enter) and wait for review. - Rejected images are under the Rejected filter, with the reason shown above the image. Fix them and submit again.
- If someone else is working on an image, you'll see ""<name>" is annotating this image". You can only view it, and their changes show up live. Once they leave, it becomes editable automatically.
- If the network drops, the top-right corner shows "Live connection lost, reconnecting". It continues automatically once the connection is back, and nothing already saved is lost.
9.4 Review
- Reviewers (or you) filter by Labeled on the Annotate page and go through the images one by one.
-
If it's fine: click Approve & next (
Enter). - If there's a problem: click Reject, check the common reasons (Missed objects, Inaccurate box, Wrong class, Extra annotations, Wrong keypoints), or describe what needs fixing, then click Reject.
- Rejected images go back to "Rejected" for the original annotator, who fixes them and submits again.
9.5 Progress, workload and activity
- Online: the member list shows who's online and which image they're viewing; click to jump there. A green dot on "Collaborate" in the left navigation means collaboration is running.
- Progress and workload: for Today / Last 7 days / Last 30 days / All, it shows each person's submitted images, objects annotated, approvals and rejections, approval rate, reviews, and active time (adding up gaps of no more than 5 minutes between actions). Click Export CSV and open it in Excel, which makes per-piece billing for outsourcing easy.
- Activity log: who signed in, submitted, reviewed, rejected, changed classes or assigned tasks, and when. Click an image number to jump to it. Check Include every autosave for more detail.
9.6 Choosing a sharing method
| LAN | Online · Self-hosted relay | Online · Xuntong official relay | |
|---|---|---|---|
| Good for | Same company network, same Wi-Fi | Outsourcing, working from home, with your own cloud server | Outsourcing, working from home, no server |
| Address members open | http://<your-computer-IP>:8765/ | https://<your-relay>/s/<id>/ | https://xuntongai.com/wulabel-relay/s/<id>/ |
| Speed | Fastest | Depends on server bandwidth | Depends on Xuntong server bandwidth |
| Data passes through | Company intranet only | Your own server (forwarded only, not stored) | Xuntong's servers (forwarded only, not stored) |
| What you need | Nothing | A cloud server with the relay service installed per relay/README.md | A Xuntong AI account (sign in under Settings) |
- With all three methods, images and annotations are stored only on your computer; the relay server just forwards them.
- The share ID for online modes stays the same: next time you start, it's the same address, so members only need to bookmark it once.
- Your computer must stay on, with Wulabel collaboration running, for members to connect; if your computer goes to sleep, members will see "The host's Wulabel is offline right now". Consider turning off automatic sleep in your power settings.
9.7 Who can do what
| Action | Admin (you) | Reviewer | Annotator |
|---|---|---|---|
| Images visible | All | All | Only those assigned to them |
| Draw boxes, edit annotations | ✓ | ✓ | ✓ (own images only) |
| Submit | ✓ | ✓ | ✓ |
| Approve, reject | ✓ | ✓ | |
| Add and edit classes and recognition notes | ✓ | Depends on the "Members can add and edit classes" switch | Depends on the switch |
| Delete classes | ✓ | ||
| SAM, model pre-labeling, text prompt | ✓ | Depends on the "Members can use AI assistance" switch (runs on your computer) | Depends on the switch |
| Xuntong AI pre-labeling | ✓ | ||
| Chat with AI about recognition rules | ✓ | Depends on the "AI assist" switch (uses your Xuntong quota) | Depends on the switch |
| Assign tasks, manage members, statistics | ✓ | ||
| Import, export, train, deploy, health check | ✓ |
Only one person can edit an image at a time: whoever opens it first gets the "lock", and others see it read-only, with the changes shown live. The lock is released automatically when that person moves to the next image, closes the page, or has been offline for 90 seconds.
9.8 A complete example
Say an outsourcing team labels 2,000 waste sorting images and your own team reviews them:
- Prepare: create a detection project in Wulabel, import the 2,000 images, and add the classes on the right (Recyclables, Food waste, Hazardous waste, Other waste). You can first batch pre-label them with a Xuntong AI dedicated model (see 16.4), so annotators only need to fix mistakes, which is much faster.
- Add members: on the "Collaborate" page, add 3 annotators (Alice, Bob and Carol from the outsourcing team) and 1 reviewer (Chris from your own team), and send each of them their account and password.
- Start collaboration: choose "Online · Xuntong official relay" (or a self-hosted relay), check "Watermark", start it, and send the internet address to all 4 people.
- Assign: select all annotators, scope "Unlabeled images not yet assigned", leave the per-person count empty, and click Assign. Each person gets about 666 images.
-
Annotate: annotators open the address in a browser and sign in. They only see their own images, and press
Enterto submit each one when done. -
Review: Chris filters by "Labeled" and checks each image. If it's fine, press
Enterto approve; if not, click "Reject", check "Missed objects" and write "There's another bottle in the bottom-right corner". The rejected image goes back to "Rejected" for the original annotator, who fixes it and submits again. - Track progress: on the "Collaborate" page you can see who's online, who's fast and who gets rejected a lot. If someone falls behind, use "Take back tasks" to take back their unfinished images and assign them to someone else.
- Settle up: under "Progress and workload", choose a time period, click "Export CSV", and pay the outsourcing team based on submitted images and approval rate.
- Wrap up: once everything is approved, stop collaboration and go back to training, evaluating and deploying in Wulabel as usual.
9.9 FAQ
-
A member can't open the LAN address:
- Make sure they're on the same network as you (the same company network or Wi-Fi; guest networks usually don't work);
- The first time you start, click "Allow" on the Windows Firewall prompt. If you clicked "Cancel", go to "Windows Security → Firewall & network protection → Allow an app through firewall" and check Wulabel;
- If the port is in use, switch to another, e.g. 8766.
- A member sees "The host's Wulabel is offline right now": your Wulabel isn't running collaboration, your computer went to sleep, or the network is down. Start it again and ask them to refresh the page.
-
The internet address keeps showing "Connecting to relay server…":
- Self-hosted relay: check that the address and secret match what you used when deploying;
- Official relay: make sure you're signed in to your Xuntong AI account.
- A member sees "This image isn't assigned to you": annotators can only open images assigned to them. Have the admin assign the image to them, or let someone else annotate it.
- Two people want to edit the same image at once: not possible; whoever opens it second gets read-only access. Once the first person moves to the next image, it can be edited.
- If a member loses their connection, is their work lost?: nothing saved is lost (every change is saved to your computer automatically). Once the network is back, the page reconnects automatically.
- Can members annotate on a phone?: they can open and view, but a computer is still recommended for drawing boxes.
- How many people at most?: there's no hard limit; a dozen or so people annotating at once is fine. With many people, keep your computer on and your network stable.
- What happens when I stop collaboration or close Wulabel?: members are disconnected immediately and see "The host has stopped collaboration"; all saved annotations are kept. Next time you start it, they can refresh the page and continue.
- Switched projects: collaboration stops automatically. Collaboration applies to the project that's currently open.
9.10 Offline packages
Use this when there's no network or data can't leave the company. Each package is a standalone Wulabel project that you copy to someone to annotate, then merge back when they're done.
Split into packages:
- On the Data page, click Manage → Team collaboration (split into packages, merge back) and switch to Split into packages.
- Save to: choose a folder where the annotation packages will be created.
- Enter the Annotators, one per line (or separated by commas), e.g. "Alice", "Bob". One package is created per person.
- Choose the scope: Unlabeled images only / Unreviewed (unlabeled + labeled awaiting review) / All (except skipped).
- Check Include existing annotations: for images pre-labeled by a model, annotators can correct them, which is faster.
- (Optional) Check Anonymize images to anonymize faces, license plates and other private areas before sending (see 13.2).
- Click Split into N packages. When it's done, the destination folder opens automatically. Copy each package folder to the right person, who uses Open project in Wulabel to start annotating.
Merge back:
- Copy the finished package folders back.
- Open Team collaboration and switch to Merge back (or click Merge for that package directly in the "Packages sent out" list).
- Select the package folder. Options: On conflict, overwrite with the package version (images that were also changed in the original project after splitting are not overwritten by default), Also import images the annotator added to the package.
- Click Merge. The result shows how many images were merged, how many were unchanged, how many were added, and how many conflicts there were. If there are conflicts, click Review one by one.
10 Train
Click Train on the left. Before your first training run, install the training environment (see Chapter 2). If it isn't installed, the page shows Install.
10.1 Set training parameters
The top of the page shows the number of "Trainable images" (labeled images; with team collaboration, reviewed images are included too). Images that haven't been split yet are split 8:2 into the training and validation sets automatically when training starts. Images that have already been split stay where they are, so you can compare training runs directly.
Click View and adjust next to "Trainable images" to see which set each image is in:
- Training set: the model learns from these images;
- Val set: not used for learning; after each epoch the model is evaluated on it, and the best epoch is saved;
- Test set: not used at all during training. After training, it's scored separately on the "Evaluate" page, which is the closest to how the model will perform once deployed.
In the dialog, click images to select them (double-click to open them for annotation), then click Move to training set / Move to val set / Move to test set to adjust by hand. Below, you can change the training / validation / test ratios, then click Assign the N unassigned images now or Re-split all (the previous split is reshuffled, so earlier and later training runs can't be compared directly). If the training set ends up empty, you'll be warned and training can't start.
| Option | Description |
|---|---|
| Starting point | Default is "Start from pretrained weights (from scratch)". After adding new data, you can choose "Continue from "<run>"", which is faster and more stable than training from scratch. If the classes have changed, the classification part is relearned. |
| Model | Listed by project task. The one marked "Recommended" is based on this computer: for detection projects, YOLOX-Tiny without a dedicated GPU, YOLOX-S with 4 GB+ VRAM, YOLOX-M with 8 GB+, and YOLOX-S on Mac. New detection projects default to YOLOX-S. When continuing training, that run's model is reused. |
| Epochs | The less data you have, the more epochs you need; usually 20–50. |
| Input size | Use a larger size for small objects (distant people, hard hats); it will be slower. Classification usually uses 224. |
| Batch size | Lower it if you get out-of-memory errors. |
| Training data | "Current data" or a dataset version. |
| Device | "Auto (use GPU if available)" or "CPU only". |
| Use reviewed images only | Only with team collaboration: when checked, only reviewed images are used for training. |
Input size, batch size, augmentation, device and "Use reviewed images only" (only with team collaboration) are under "Advanced settings", collapsed by default. Click "Advanced settings" to expand it; the app remembers whether you last left it expanded or collapsed.
If GPU memory runs out during training (from v0.4.2), the app automatically halves the batch size and restarts training from the beginning, down to a minimum of 1. You'll see a one-time notice, and the training run also records "Batch size 2 (reduced from 8 automatically due to low GPU memory)". Smaller batch sizes train more slowly; if memory is really tight, you can also switch to a smaller model or reduce the input size.
Available models:
| Task | Model | Notes |
|---|---|---|
| Detection | YOLOX-Nano | The lightest of the YOLO family, for CPUs, phones and very weak edge devices; 416 input by default |
| Detection | YOLOX-Tiny | Very light, for real-time inference on CPUs and NPU edge boxes; 416 input by default |
| Detection | YOLOX-S | Best balance of speed and accuracy; start with this for most projects |
| Detection | YOLOX-M | Higher accuracy; 6 GB+ VRAM recommended |
| Detection | YOLOX-L | Highest accuracy, slowest; 8 GB+ VRAM recommended |
| Detection | Faster R-CNN MobileNetV3 | Fast with low GPU memory use; good for beginners and computers without a dedicated GPU |
| Detection | Faster R-CNN ResNet50 | Higher accuracy, slower; 6 GB+ VRAM recommended |
| Detection | RetinaNet | Single-stage, accuracy close to Faster R-CNN, converts to TensorRT more smoothly |
| Detection | FCOS | Single-stage, anchor-free, simple structure; good for deployment |
| Detection | SSDLite | Single-stage, very light, for CPUs and NPU edge devices; fixed 320 input, so-so on small objects |
| Segmentation | Mask R-CNN | Instance segmentation; 6 GB+ VRAM recommended |
| Keypoints | Keypoint R-CNN | Uses COCO pretraining for 17-point human pose |
| Classification | MobileNetV3 / EfficientNet-B0 / ResNet50 | From light and fast to more accurate |
10.2 YOLOX models
YOLOX is a YOLO-family detection model open-sourced by Megvii (Apache-2.0, safe for commercial use), from the same family as the dedicated models on the Xuntong AI platform.
- Pretrained weights: the official COCO pretrained weights are downloaded automatically on your first training run (Nano about 8 MB, S about 70 MB, L about 430 MB), first from the official website and then from GitHub if that fails. Once downloaded, they don't need to be downloaded again.
- Augmentation: uses the official YOLOX recipe. Mosaic, MixUp, random scaling and rotation, color jitter, horizontal flip and multi-scale training are all turned on automatically, and strong augmentation is turned off for roughly the last 10% of epochs to finish up. That's why the "Augmentation" settings below aren't shown when YOLOX is selected.
- Epochs: YOLOX needs somewhat more epochs than Faster R-CNN; 50+ is recommended, or around 100 with little data (a few hundred images).
- Learning rate: scaled automatically by batch size. There's nothing to set.
- Input size: Nano and Tiny default to 416; S, M and L default to 640. You can change it; it's rounded to a multiple of 32.
- Why not YOLOv5 / v8 / v11: they're licensed under AGPL-3.0, which restricts use in commercial products. YOLOX is Apache-2.0, the same as Wulabel. YOLOv5 / v8 / v11 models trained elsewhere can still be brought in via "Import external model" for pre-labeling and evaluation.
Trained YOLOX models work like any other model: evaluation, model pre-labeling, false-positive tests, live test, export for deployment, and uploading to Xuntong are all supported.
10.3 Augmentation
Randomly altering images during training shows the model more variety, which helps noticeably when you have little data.
- Under "Augmentation", choose a preset: Off, Default, Light, Standard, Strong (for small datasets).
- To fine-tune, expand it and change Horizontal flip, Vertical flip, Brightness, Contrast, Saturation, Hue, Blurry (simulates out-of-focus and motion blur), Noise (simulates low-light night shots), Multi-scale (helps with objects whose size varies a lot with distance), Rotation, Random crop. Once you change anything, the preset shows "Custom".
- Click Preview to see a few images after random augmentation (each image is randomly altered twice, and the red boxes are the annotations following the transforms), to make sure it isn't too extreme.
10.4 Start training and watch progress
- Before you start, check "~N steps per epoch · ~M total" above the button. If there are too few images (fewer than 20 in the training set) or too few total steps (fewer than about 300), clicking Start training first shows a warning: training like this will most likely learn nothing, and the metrics may stay at 0. Label more images, or increase the epochs as suggested; with very little data you can also start with Faster R-CNN MobileNetV3. If you really just want to try it, click Start anyway. You'll also be warned when the val set has only one or two images: the metrics will swing a lot and can't be trusted.
- Click Start training. The first time, pretrained weights are downloaded, and it shows "Preparing…".
-
During training it shows "Epoch N / M · progress in this epoch · loss · ETA", with the Loss curve, the Val set metric curves and the Log below.
- "Key info" above the log always shows the first few lines of the log: the device used, the number of images in the training and val sets, and whether the pretrained weights were loaded. Error and warning lines are highlighted in yellow.
- Scrolling up in the log won't pull you back to the bottom; when you're at the bottom, it follows new lines.
- If the pretrained weights couldn't be downloaded (usually a network problem), or the metrics stay at 0 for 10 epochs in a row, a yellow banner appears at the top of the page with the likely cause and what to do.
- To finish early, click Stop and confirm; it stops after the current batch finishes. The best model so far is kept, and you can pick it later to "continue training".
-
When training ends, a system notification pops up and the taskbar icon flashes (so you'll know even if the app is in the background). Inside the app, the bottom-right corner shows "Training finished" with the best metric and a rating (poor / fair / good enough):
- If the results are fine, you can click Evaluate or Pre-label directly;
- If the results are poor, you'll be prompted to click See why to go back to the Train page and take a look;
- If training fails, you'll get a notice even when you're not on the Train page; click View error to see it.
- When training fails, common errors are explained in plain words with a button to fix them: the GPU driver and PyTorch don't match (Change PyTorch version in Settings), not enough GPU memory or RAM (Use CPU), the disk is full, a network download failed, or image files can't be found (Go to Data). Click Details to expand the full error message.
10.5 Training runs and comparison
Each training run is saved automatically as an entry under Training runs, listing the time, model, data, epochs, metrics and status (Training / Done / Stopped / Failed). For each entry you can:
- View evaluation (opens the evaluation of this particular run), Export ONNX, Open training folder, or delete it. Runs still in training can't be evaluated or deployed until they finish.
Compare training runs:
- In Training runs, check two or more runs.
- Click Compare selected (N).
- The comparison window shows the parameters and data side by side (differences in bold), each metric, and the loss curves overlaid, and marks the best run for each class.
10.6 Import an external model
Detection models trained elsewhere (e.g. Ultralytics YOLO) can be exported to ONNX and imported here for pre-labeling, health checks, evaluation and false-positive tests (they can't be trained further or deployed). Only detection projects are supported for now.
- Click Import external model above Training runs.
- Click Select .onnx file.
-
The app detects automatically:
- Format: YOLOv8 / v11 (Ultralytics), YOLOv5 / v7, YOLOv10 and other end-to-end models, YOLOX, RT-DETR, DETR / RF-DETR, and models exported from Wulabel. If it's detected wrong, change it manually;
- Input size;
- Class names (one per line, in the model's order). Rename the model's class names to your project's class names to map them, e.g. change "person" to your project's "Person" class.
- Classes to use: unchecked classes are skipped during pre-labeling; classes matching project class names are checked by default.
- Click Import. A new "… (external)" entry appears in Training runs.
11 Evaluate
Click Evaluate on the left and choose a training run (if you came from "View evaluation" on the Train page, that run is already selected). Runs still in training show "Training" and can only be chosen once they finish.
11.1 Metrics
- The top says which epoch's best model this evaluation uses. You can switch between the Val set and the Test set.
- The very first line is the Verdict: a rating of "poor / fair / good enough" based on the main metric (detection-type projects use mAP50: below 0.3 is poor, 0.3–0.6 fair, above 0.6 good enough; classification uses accuracy: below 0.6 is poor, 0.6–0.85 fair, above 0.85 good enough), and it points out the worst class. Next to it are buttons for the next step: view the missed-detection errors, send the errors to annotation, add data and retrain / switch to a bigger model; when the results are good enough, there's Go to deployment. If fewer than 10 images were evaluated, you'll be warned that the metrics fluctuate a lot.
- Detection, segmentation and keypoint projects: mAP50 (the most common detection metric), mAP50-95 (demands more accurate boxes), Precision (the share of predicted boxes that are correct; low means many false positives), Recall (the share of real objects that are found; low means many missed detections). Segmentation and keypoints are computed on bounding boxes.
- Classification projects: Accuracy, Macro F1, mean precision, mean recall.
- Hover over a metric for an explanation.
- Per class table: each class's image count, GT box count and metrics.
11.2 Confusion matrix
Rows are actual classes, columns are model predictions. The diagonal is correct; other cells are one class mistaken for another. The last column "Background" is missed detections, and the last row "Background" is false positives. Hover to see the exact numbers.
11.3 Errors
- Lists the images with problems. You can filter by Missed, False positive and Wrong class.
- Click an error to jump straight to the Annotate page to check and fix it. Fix, retrain, and the loop is closed.
11.4 Confidence threshold
Which threshold to alert at when deployed? Look here:
- The app recommends the threshold with the highest F1 and shows the precision and recall at that threshold.
- The curves show how precision, recall and F1 change with the threshold. Drag the slider to see results at different thresholds: how many correct, how many false positives, how many missed.
- How to choose: too many false positives, raise the threshold; too many missed detections, lower it.
- The table below shows the recommended threshold per class.
- The recommended threshold is carried over automatically to the live test and the inference service package on the "Deploy" page as the default confidence threshold.
11.5 Evaluate with current data
After adding data or fixing annotations, you don't need to retrain. Click Evaluate with current data to recompute the metrics with the current annotated data (val set / test set). Imported external models are evaluated this way too.
11.6 False-positive test
Use a video that shouldn't trigger alerts (no objects, or only things that are easy to mistake, such as an empty walkway or a factory at night) to test how many false alarms the model raises:
-
Under "False-positive test", click Choose video file, or enter an
rtsp:///http(s)://address. - Settings: Detect N frames/s, Alert after N consecutive detections, Test for N minutes (for video streams).
- Click Start test. You can click Stop early at any time.
- Results: how long it ran, how many alerts, and the Per hour rate, broken down by class; below are the False-positive frames (red boxes are what the model reported; only the latest 60 are kept).
- Click Add these frames to the dataset as negative samples: they're added as "No objects" images, so the next training run learns not to alert on scenes like these. If any of them contain real objects, annotate them on the Annotate page after adding.
11.7 Export a delivery report
- Click Export report and choose where to save it (default file name "<project>_<run>_model_report.html").
- The report is a single HTML file containing the data overview, training parameters, metrics, curves, confusion matrix, errors, recommended threshold and false-positive test results. Open it directly in a browser and send it to your client for acceptance.
12 Model pre-labeling and picking images
12.1 Pre-label with your own model
- Go to the Annotate page. In "AI assist" on the right, choose My models and pick a trained model from the drop-down (showing its name and mAP50 / accuracy).
- Adjust Confidence.
- Single image: press P or click Predict this image (P).
- In bulk: click Batch pre-label to label a whole batch of unlabeled images. The dialog closes right away and the progress bar is on the right, so you can keep annotating while it runs. To stop halfway, click Stop next to the progress bar; images already labeled are kept.
- Pre-labeled boxes are dashed. Check and fix them, then press Enter (Done & next), and the image counts as Labeled. Classification projects show "Model suggestions"; click one of the top 3 classes to apply it.
The more you label → the more accurate the model → the less work pre-labeling leaves you.
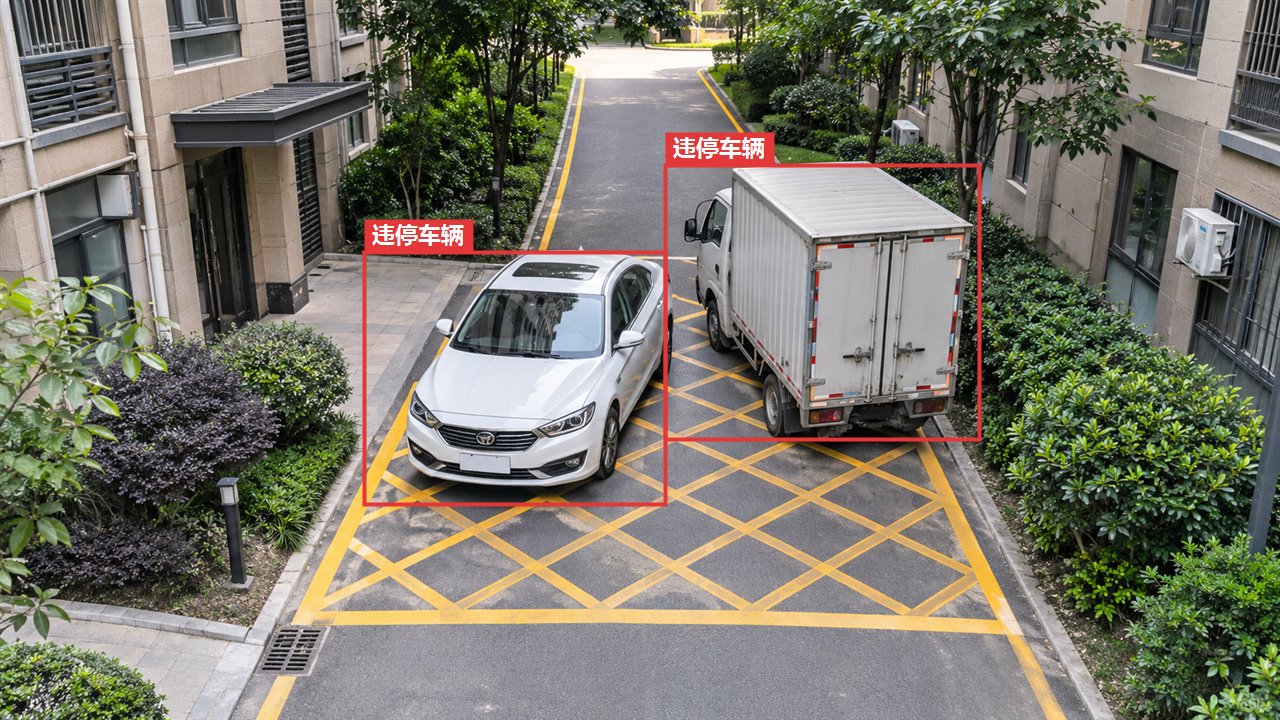
12.2 Pick the images most worth annotating
Once you have a first model, rather than labeling at random, label the images the model is least sure about first:
- On the Data page, click Manage → Pick the images most worth annotating (with a model).
- Choose a model, fill in Pick N, and click Start picking.
- Results are sorted from least to most certain.
- Click Annotate in this order, and the Annotate page shows only this batch (a "Model picks" filter appears at the top). When you're done, click the × next to it to go back to all images.
13 Export datasets (with anonymization)
13.1 Export
- On the Data page, click Export dataset.
-
Format (depends on the project task):
- Detection: YOLO, COCO, VOC;
- Segmentation: YOLO-seg, COCO, VOC (bounding boxes only);
- Keypoints: YOLO-pose, COCO keypoints, VOC (object boxes only);
-
Classification: class folders (
train/<class>/<image>.jpg).
- Scope: unlabeled and skipped images are not exported; images marked "No objects" are exported as negative samples. With team collaboration, you can also check Export reviewed images only.
- Train / Val / Test ratio (%): images not yet split are assigned by these ratios. To redo the whole split, click Re-split all (previous training results won't be directly comparable with the new split).
- Export to: click Browse to choose a location. The Folder name is generated automatically and can be changed (once you change it, switching formats won't overwrite it).
- Click Export. When it's done, it shows how many images and annotations were exported and how many went into each split; click Open folder to view them.
To export a dataset version: click Export this version in the dataset version list. The split is fixed to the one stored in the version.
13.2 Anonymization
When exporting a dataset, exporting a version, or splitting into packages, you can check Anonymize images:
- By class: choose the classes to anonymize from the drop-down, e.g. the "Face" and "License plate" classes you labeled. Classes with "face" or "plate" in their name are selected by default.
- Auto-detect: check Auto-detect faces and Auto-detect license plates, and the app finds them with an open-vocabulary detection model (the model is downloaded the first time; much faster with a GPU).
- Method: Mosaic, Blurry (blur), Black out.
- The export shows an extra "Anonymize" stage in its progress.
Anonymization only changes the exported copies; the original images in the project are untouched. Auto-detection may miss very small faces, side profiles and distant objects, so spot-check important data.
14 Deploy
Click Deploy on the left and choose a trained model. The page has four tabs: Live test, Export model, Inference service package, Field data loop.
14.1 Live test
Connect a camera or a video and see how the model performs in the real world:
- Choose Video streams or Local video.
-
Enter the stream address: an RTSP camera (e.g.
rtsp://admin:password@192.168.1.64:554/Streaming/Channels/101), or an HTTP-FLV, HLS (m3u8) or MP4-over-http address. You can also click Choose video file. - Click Start. Results are drawn on the video in real time: boxes for detection models, outlines for segmentation models, points and skeletons for keypoint models, and the top classes in the upper-left corner for classification models. The top shows the resolution and whether inference is on the GPU or the CPU.
- Drag the Confidence slider to adjust the threshold. It defaults to the recommended threshold from the Evaluate page; after changing it, click "Use recommended 0.xx" to change it back.
- When you see missed detections or false positives, click Add snapshot to dataset. The image is added as "Unlabeled"; annotate it and retrain.
- Click Stop to finish.
14.2 Export model
-
Choose formats:
- ONNX (dynamic size): a universal format; onnxruntime runs it on Windows / Linux / ARM;
- ONNX (fixed size): input fixed at [1,3,N,N], for inference frameworks that need a fixed shape;
- OpenVINO: acceleration on Intel CPUs, integrated graphics and industrial PCs, converted and verified right in the app (OpenVINO is installed automatically on first use);
- TensorRT conversion package: for NVIDIA GPUs and Jetson; run the script on the target device to build the engine;
- RKNN conversion package: for Rockchip RK3588 / 3568 and similar; run the script on Ubuntu to convert.
- If you need a fixed size, set the size.
- Choose the Export to location and the Folder name, then click Export. Each format shows whether it succeeded or failed; click Open to view it.
The built-in Faster R-CNN is a two-stage model, and NPUs (RKNN) and older versions of TensorRT have limited support for it, so conversion may fail or run slowly. For such devices, train YOLOX or another single-stage model (RetinaNet, FCOS, SSDLite). ONNX and OpenVINO are safe to use.
When exporting YOLOX models: ONNX (dynamic size) and OpenVINO work the same as for other models, with resizing, decoding and duplicate box removal (NMS) built into the model, so they output results directly. ONNX (fixed size), TensorRT and RKNN conversion packages use the official YOLOX format (BGR input in 0–255, padded with 114 at the top left, output without NMS). All operators are plain convolutions, so NPUs and TensorRT can run the whole model; see the README in the conversion package for post-processing.
Segmentation and keypoint models (Mask R-CNN, Keypoint R-CNN) can also be exported to ONNX, OpenVINO and other formats. Segmentation models have an extra output masks (mask probabilities for each object; above 0.5 is the object), and keypoint models have extra outputs keypoints (x, y and visibility of each point) and keypoints_scores. Live test and the inference service package support detection, segmentation, keypoint and classification models.
14.3 Inference service package
Builds an inference service that runs as soon as you copy it to an on-site computer. Detection, segmentation, keypoint and classification models are all supported:
-
Video streams: enter a name and address (
rtsp://…, anhttp(s)://…FLV / m3u8 / MP4 address, or a video file path). Click Add stream to add more streams. - Detection interval (s): how often to run detection on one frame of each stream.
-
Alert rules:
- Alert classes (leave empty to alert on all classes);
- Confidence threshold (defaults to the recommended threshold from the Evaluate page);
- Dedup interval (s): alert at most once in this period for the same class on the same stream;
-
Active hours: all day, or e.g.
07:00-19:00; - Save alert snapshots (with boxes).
-
Alert delivery:
- Webhook: POST JSON to this URL on alert, optionally with Include snapshot (base64);
- MQTT: server address, topic, username, password (leave empty to disable).
- Service: HTTP API port; GPU inference (the on-site computer needs onnxruntime-gpu installed, otherwise the CPU is used automatically).
-
Field data loop: frames the model is unsure about (confidence within the set range) are saved to the service package's
reflux/folder. - Choose the Output to location and click Build inference service package.
-
Copy the whole folder to the on-site computer: on Windows, double-click
run.bat; on Linux, runsh run.sh. The configuration is inconfig.json, and instructions are inREADME.md. The on-site computer doesn't need PyTorch or a GPU; it only depends on onnxruntime, OpenCV and numpy.
14.4 Field data loop
-
While the service package runs on site, it saves frames the model is unsure about to the
reflux/folder. -
Regularly copy
reflux/back, then on the Field data loop tab click Import field images and select that folder. - Click Go to annotation, filter by "Unlabeled", pre-label with the model, then correct the results.
-
Retrain, then build a new service package to replace
model.onnxon site. The model keeps getting better the more it's used.
14.5 Upload to the Xuntong AI platform
If you don't want to deploy a service yourself, upload the model to the Xuntong AI platform and connect cameras and set up alerts there (object detection models only for now):
- First set up Xuntong AI in Settings (see 2.3).
- Under "Upload to Xuntong AI platform" at the bottom of Deploy → Export model, adjust the Model name and click Upload. If ONNX hasn't been exported yet, it's exported automatically first.
- After upload, the platform takes a few seconds to a minute to validate it, showing "The platform is validating it". Once validated, it changes to "Validated" (if it fails, the reason is shown). The recommended threshold from the Evaluate page is uploaded with it and becomes the default threshold on the platform.
- Click Open console, go to "Custom models", and click Enable. Then you can connect cameras and set up alerts.
- "Custom models on the platform" below lists the uploaded models, their validation status and whether they're enabled. Accounts without hosting can only hold 1 model; Delete the old one before uploading a new version.
- Alert images generated on the platform can be fetched back for annotation (see 4.7).
15 Send feedback
- Click Feedback in the top-right corner.
- Describe the problem or suggestion.
- (Optional) Email: once the problem is resolved, the author will email you the result. The app remembers it after the first time, so you don't have to enter it again.
- Attach a screenshot of the current screen is checked by default, and you can see a preview. Uncheck it if you don't want to include it.
- Attach logs is checked by default (from v0.4.2): the training environment, the logs and errors from the current project's last two training runs. Click "View contents" to see exactly what will be sent; your user name in paths is replaced with ~. Uncheck it if you don't want to include it.
- Click Send. Your description, screenshot, logs, app version and OS are sent to the developer. Your project images and annotations are never uploaded.
You can also open an issue in the GitHub repository.
16 Xuntong AI guide
Xuntong AI (xuntongai.com) is an AI recognition platform. It has ready-made dedicated recognition models (waste sorting, hard hats, smoke and fire, etc.) and LLM recognition, and it can also host your own models, connect cameras and push alerts. With Wulabel connected to it, annotation, training, going live and field data form a closed loop. The earlier chapters cover its features here and there; this chapter brings them together.
Where Xuntong AI is used in Wulabel:
| Where | What it does | See |
|---|---|---|
| Settings → Xuntong AI | Sign in, check your quota | 16.1, 16.2 |
| Annotate → AI assist → Xuntong AI | Auto-label with dedicated models / LLM / project classes | 16.3–16.5 |
| Annotate → AI assist → Recognition rules | Write recognition notes, chat with AI about how to recognize, sync to the platform | 16.5 |
| Deploy → Export model → Upload to Xuntong AI platform | Put your trained model on the platform | 16.6 |
| Data → More import options → Fetch alert images from Xuntong AI | Bring on-site false positives and missed detections back for annotation | 16.7 |
| Collaborate → Online · Xuntong official relay | Let members on the internet join in | 16.8 |
16.1 Sign in
- Open Settings and click Sign in to Xuntong AI in the "Xuntong AI" section.
-
Your browser opens the Xuntong AI web page:
- Sign in first if you aren't already (the same way you normally sign in to Xuntong; verification code or SMS both work);
- Check that the confirmation code on the page matches the one in the Wulabel dialog, then click Allow.
- Back in Wulabel, after a few seconds it shows Signed in as with your account name and plan, remaining quota, and the recognition methods you can use.
Notes:
- No need to create and copy an API key in the console: at sign-in, the platform issues a dedicated key for this computer, named "Wulabel · <computer name>". You can see it on the "API Key" page of the Xuntong console, and disable it there too.
- Signing in again on the same computer replaces the old key automatically. Personal accounts can have up to 2 keys; when that's full, you can't click "Allow" on the web page. Disable an unused key in the console and try again.
- If the browser didn't open: click Reopen in the dialog, or copy the address and open it yourself. The sign-in code is valid for 10 minutes.
- Sign out: the key on this computer is deleted, and the key issued at sign-in is disabled on the platform.
- If you already have an API key, or your Xuntong platform is self-hosted: click Advanced: enter an API key manually or a self-hosted platform address.
16.2 Quota and cost
- The Settings page shows how much of each quota is left and when it expires: LLM recognition, dedicated model recognition, custom model recognition, add-on packs and so on, depending on your plan.
- How it's counted: recognizing one image counts as 1 image. Before batch pre-labeling, you'll see the total number of images; each round of chatting with AI about recognition rules counts as 1 image of LLM quota.
- Only your own account's quota is used; when collaboration members chat with AI, it uses the host's quota (the host can turn off "Members can use AI assistance" on the Collaborate page).
- When the quota runs out, you'll see "quota exceeded", and batch pre-labeling stops. Images already labeled are kept.
16.3 Choosing between the four recognition methods
Choose Xuntong AI in "AI assist" on the right of the Annotate page. The "Select a recognition model" drop-down has:
| Recognition method | Good for | Speed | Quota |
|---|---|---|---|
| Dedicated models (e.g. waste sorting, hard hats) | The project's classes match a ready-made platform model | Fastest: 8 images per batch, two batches sent at a time | Dedicated model recognition |
| Custom models you uploaded and enabled | Models you trained yourself and uploaded to the platform | Same as above | Custom model recognition |
| Recognize by project classes (recommended) | No matching model on the platform; you only want the project's few classes | One image at a time, slower | LLM recognition |
| General LLM recognition | Finding hazards by broad safety category (fire safety, electrical, sanitation, etc.) | One image at a time | LLM recognition |
It's simple: if there's a matching dedicated model, use it (fast and accurate); if not, use Recognize by project classes and write clear recognition notes for each class (16.5).
16.4 Batch auto-labeling with a dedicated model
Using waste sorting as an example:
- Create a detection project and import images. You don't have to create the classes first: when the model recognizes a class name (e.g. "Recyclables") that the project doesn't have, it's created automatically.
- Open the Annotate page, choose Xuntong AI in "AI assist" on the right, and choose Waste sorting as the model.
- Adjust Confidence: start with the default; raise it if there are too many boxes, lower it if a lot is missed.
-
Press
Pfirst to label the current image and see how it does. If you're happy, click Batch pre-label. It recognizes all "Unlabeled" images that have no annotations yet, batch by batch, with a progress bar. -
Recognized boxes are dashed (source "Xuntong"). Check each image: delete the wrong boxes, drag the off ones into place, add what was missed, and press
Enter(Done & next). - To go even faster: after a few hundred images, train your own model with this data (Chapter 10) and pre-label locally from then on, without using quota.
If a batch hits "too many requests", it slows down and retries automatically without being charged twice; errors like quota exceeded or a model not enabled stop it and tell you how many images were labeled.
16.5 Recognize by project classes and recognition rules
When there's no matching model on the platform, use "Recognize by project classes": the platform only looks for your project's classes, with class names matched exactly, and nothing outside the list is ever reported. How well it works depends on how clearly you state the rules.
Write recognition notes:
-
Under the edit button next to a class, fill in the Recognition notes: what exactly this class means, and what does / doesn't count. For example:
- No helmet: a person without a helmet on; wearing a helmet without fastening the strap also counts; box only the head and upper body.
- E-bike: two-wheeled electric bikes and scooters; bicycles and motorcycles don't count.
- Or click Recognition rules next to the "AI assist" title, and under Current rules edit the Overall rules (apply to all classes, e.g. "Only look at the walkway in the lower half of the frame; ignore posters and anything on screens") and each class's notes in one place, then click Save rules.
Chat with AI: if you're not sure how to write the rules, say it in plain words under Recognition rules → Chat with AI:
- "A helmet with the strap undone still counts as no helmet"
- "Reflective vests don't count as helmets"
- "Why wasn't the person on the left of this image recognized?"
The current image is attached by default, and after replying, the AI tries recognizing this image with the new rules. When the AI suggests rule changes, it lists the details, and they're only saved when you click Apply these rules; if the trial recognition found something, click Add the trial boxes to this image to use them directly.
Sync to the Xuntong platform (optional): at the bottom of "Current rules", click Sync to Xuntong platform to store the rules on the platform. It's disabled by default, so the platform's current recognition is unaffected.
To make the Xuntong platform's own recognition (snapshots, alert push) report only your project's classes, turn on Use these rules for platform recognition. Note: once on, recognition for your whole Xuntong account follows these rules; the scenes it applies to can be adjusted on the "Recognition rules" page of the Xuntong console.
Once bound, every time you save or apply rules the content syncs automatically, but it won't change the on/off state or the scenes you set in the console. To stop syncing, click Unbind; the rules on the platform are not deleted.
Limits: up to 30 classes, with class names of at most 30 characters; overall rules up to 1000 characters, and each class's recognition notes up to 500 characters; each Xuntong account can have up to 20 rule sets.
16.6 Upload your trained model to Xuntong
- Train an object detection model in Wulabel (Xuntong currently only accepts detection models).
- Go to Deploy → Export model. Under "Upload to Xuntong AI platform" at the bottom, adjust the model name and click Upload. If ONNX hasn't been exported yet, it's exported automatically first; the recommended threshold from the Evaluate page is uploaded with it.
- The platform takes a few seconds to a minute to validate it: it shows "Validating" → "Validated" (or "Validation failed" with the reason).
- Click Open console, go to "Custom models", and click Enable. Once enabled, you can connect cameras and set up alerts on the platform, and you can also choose it from the model list on the Annotate page.
- "Custom models on the platform" below lists the uploaded models, their validation status and whether they're enabled. Accounts without hosting can only hold 1 model; Delete the old one before uploading a new version. Model files can be up to 200 MB.
16.7 Fetch on-site alert images and keep improving
Once the model is live, the false positives and missed detections in on-site alert snapshots are exactly the data most worth adding:
- Data → More import options → Fetch alert images from Xuntong AI.
- Choose the time range (last 1 / 3 / 7 days), which model's alerts, and the maximum number of images. Use the platform's detected boxes as pre-labels is checked by default.
-
The fetched images are in the project's
images/xuntong_<time>/folder, with dashed boxes (source "Xuntong"). - Fix them one by one: delete false-positive boxes (for an image with no real objects, just press Enter (Done) to keep it as a negative sample) and add what was missed.
- Retrain, evaluate, and upload a new version to replace the old model on the platform.
Note: the platform keeps alert images for 7 days, so fetch regularly; only accounts with a push channel configured generate alert records.
That's the closed loop: annotate → train → upload to Xuntong → on-site alerts → fetch back and fix → retrain, and the model keeps getting better the more it's used.
16.8 Xuntong AI in collaboration
- Official relay: on the Collaborate page, choose Online · Xuntong official relay as the sharing method, and members on the internet connect through Xuntong's servers, with no server of your own needed. You must sign in to your Xuntong account first. Each account can run up to 3 shares at a time; images and annotations are forwarded through Xuntong's servers, not stored. For sensitive data, use LAN or a self-hosted relay.
- What members can use: members can't use Xuntong AI pre-labeling directly (it would use your quota); with "Members can use AI assistance" turned on, members can open recognition rules and chat with the AI (using your quota). Whether they can edit the rules follows the "Members can add and edit classes" switch.
16.9 FAQ
- Nothing happens in the browser after clicking sign in: click Reopen in the dialog, or copy the address into your browser. Do the same if your work computer blocks opening the browser automatically.
- Can't click "Allow" on the web page: the account has reached its key limit. Disable an unused key on the "API Key" page of the Xuntong console.
-
It shows "Connection failed":
- Check the reason in the message;
-
For a manually entered key, check that it was copied in full (starts with
sk-live-), is enabled in the console, and has no IP allowlist set (keys issued at sign-in have no allowlist); - You can also sign out and sign in again.
- It says "quota exceeded or too many requests": check your remaining quota on the Settings page; once the quota is used up, renew on Xuntong or buy an add-on pack. Batch labeling already throttles its own speed.
- A dedicated model is missing from the model list: your account hasn't enabled it. Activate the matching plan on Xuntong AI.
- Recognized class names differ from the project's: dedicated models use their own class names, and names the project doesn't have are created automatically. To keep names consistent, use "Recognize by project classes", or rename the class in the class editor after recognition.
- Self-hosted Xuntong: under "Advanced" in Settings, enter your own platform address and API key.
Keyboard shortcuts
General (Annotate page)
| Key | Action |
|---|---|
| 1–9 | Switch class (classification projects: pick the class directly) |
| A / D or ← / → | Previous / next image |
| Enter | Done & next (images with no objects are recorded as negative samples); with team collaboration, approve and go to the next image |
| X | Skip (left out of training) |
| Shift+D or Shift+→ | Next unlabeled image |
| Ctrl+Z / Ctrl+Y | Undo / redo |
| ? | Open the keyboard shortcuts panel |
| Ctrl+D | Copy the previous image's annotations (classification: reuse the previous image's class) |
| P | Predict / annotate this image with AI assist |
| F | Fit to window |
| Mouse wheel | Zoom |
| Space + drag / right-drag | Pan |
Detection, segmentation, keypoints
| Key | Action |
|---|---|
| R | Draw box / draw polygon / draw object box |
| V | Select, adjust |
| S | SAM smart select |
| Del / Backspace | Delete the selected object |
| H | Hide / show class names |
| Esc | Deselect |
While drawing a polygon: click to add a point, double-click or Enter to close, Backspace to undo the last point.
While placing keypoints: click for visible, Shift+click for occluded, N to skip, Backspace to go back to the previous point, Esc or Enter to finish.
While using SAM: click to select, Shift+click to exclude, Backspace to undo the last point, Enter to accept, Esc to discard.
Classification projects: Del clears the class.
准备好了?下载 Wulabel,开始标你的第一张图。